Best Oscilloscope for Home Electronics Laboratory Complete Guide
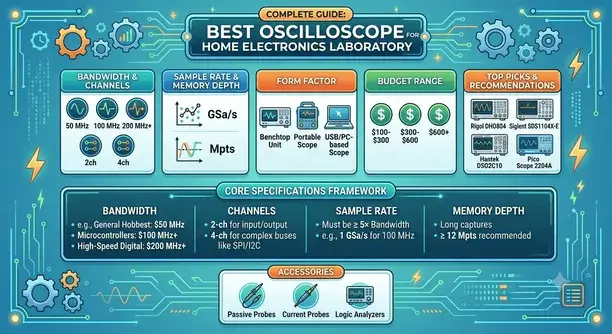
Introduction Best Oscilloscope for Home
A good oscilloscope helps you understand how electronic circuits work. It shows signals as waves on a screen. This makes it easier to find problems in circuits.
Choosing the best oscilloscope for home electronics laboratory can feel difficult. Many models have different features, prices, and uses. Beginners often feel confused about bandwidth, channels, sampling rate, and screen quality.
A home electronics lab does not always need an expensive machine. A simple and reliable oscilloscope can help with many projects. You can test Arduino boards, power supplies, audio circuits, sensors.
This guide explains key oscilloscope features, common types, practical buying factors, and basic measurement safety. It helps beginners compare options without assuming that one model fits every home lab.
What Is the Best Oscilloscope for Home Electronics Laboratory?
The best oscilloscope for home electronics laboratory depends on the signals you plan to measure, the required bandwidth, channel count, safety features, and your budget. An oscilloscope displays voltage changes over time.
An oscilloscope can show:
- Signal shape
- Voltage level
- Frequency
- Noise
- Timing problems
- Circuit errors
Unlike a normal multimeter, an oscilloscope shows how a signal changes every moment.
For example, a multimeter can tell you a circuit has 5 volts. An oscilloscope can show if that 5-volt signal has noise, drops, or unexpected changes.
Popular oscilloscope brands include:
- Rigol
- Siglent Technologies
- Tektronix
- Keysight Technologies
These brands make tools for beginners, engineers, and professional labs.
Why an Oscilloscope Matters in a Home Electronics Lab
An oscilloscope is one of the most useful tools for electronics work. It helps you understand invisible electrical signals.
Find Circuit Problems Faster
Many electronic problems are hard to find with only a multimeter.
An oscilloscope can help you find:
- Wrong signals
- Voltage drops
- Electrical noise
- Timing problems
- Bad components
This saves time during repairs and projects.
Learn Electronics Better
Beginners can learn electronics faster by seeing real signals.
For example:
- See how a PWM signal works
- Check Arduino output signals
- Study audio waves
- Understand sensor data
Visual learning makes complex ideas easier.
Improve DIY Electronics Projects
Many hobby projects need signal testing.
Examples include:
- Arduino projects
- Raspberry Pi circuits
- LED controllers
- Motor drivers
- Audio amplifiers
- Power supply designs
An oscilloscope helps make these projects more accurate.
How Does an Oscilloscope Work?
An oscilloscope measures electrical signals through a probe. The probe connects to a circuit point.
The device then:
- Receives the electrical signal.
- Measures voltage changes.
- Processes the information.
- Displays the waveform on the screen.
The screen usually shows:
- Horizontal line = time
- Vertical line = voltage
Users can adjust settings to study the signal clear.
Main Parts of an Oscilloscope
Display Screen
The screen shows the waveform. A larger and clearer screen makes testing easier.
Modern oscilloscopes often use:
- Color displays
- Touch screens
- Digital controls
- Automatic measurements
Input Channels
Channels show how many signals you can test at the same time.
Common options:
- 1 channel
- 2 channels
- 4 channels
- More advanced models
A 2-channel oscilloscope works well for most home electronics labs.
Probe
The probe connects the oscilloscope to the circuit.
Common probes include:
- Passive probes
- Active probes
- Current probes
A good probe improves measurement accuracy.
Benefits of Using an Oscilloscope at Home
Better Circuit Understanding
You can see what happens inside a circuit.
Faster Troubleshooting
You can locate problems without guessing.
More Accurate Testing
You get detailed information about signals.
Supports Many Projects
You can use it for:
- Electronics repair
- Learning experiments
- Robotics
- Microcontrollers
- Audio projects
Professional Learning Experience
An oscilloscope gives a home lab a more professional setup.
Key Features
Choosing the right oscilloscope depends on your needs.
Bandwidth
Bandwidth describes the frequency range an oscilloscope can measure within its specified performance limits. Choose enough bandwidth for the fastest signals in your projects.
For most beginners:
- 50 MHz to 100 MHz is enough
Advanced users may need higher bandwidth.
Sampling Rate
Sampling rate shows how many measurements the oscilloscope takes every second.
A higher sampling rate gives a clearer waveform.
Good beginner choices:
- 1 GSa/s or higher
Number of Channels
More channels allow more signal comparison.
Recommended:
- 2 channels for beginners
- 4 channels for advanced projects
Memory Depth
Memory depth controls how much signal data the device stores.
More memory helps when studying long signals.
Screen Quality
A clear screen makes waveform reading easier.
Look for:
- Good resolution
- Easy controls
- Clear menus
Types of Oscilloscopes
Digital Storage Oscilloscope (DSO)
A digital storage oscilloscope is the most common type today.
Advantages:
- Easy to use
- Affordable
- Stores waveforms
- Good for beginners
Most home labs use DSOs.
Analog Oscilloscope
Analog scopes show signals using older technology.
Advantages:
- Simple operation
- Real-time display
Disadvantages:
- Limited features
- Harder for beginners
Portable Oscilloscope
Portable models are small and easy to carry.
They work well for:
- Field testing
- Quick repairs
- Small projects
Comparison Table
| Model Type | Best For | Main Benefit |
|---|---|---|
| Budget Digital Oscilloscope | Beginners | Low cost and simple use |
| 100 MHz DSO | Hobby Projects | Better testing ability |
| 4 Channel DSO | Advanced Users | Tests multiple signals |
| Portable Scope | Field Work | Easy movement |
Step-by-Step Guide
Choosing the right oscilloscope becomes easier when you follow a simple process.
1. Understand Your Electronics Needs
First, decide why you need an oscilloscope.
For basic home projects, you may test:
- Arduino boards
- Sensors
- Audio circuits
- Power supplies
- Small electronic devices
A beginner does not need a high-end professional oscilloscope.
2. Select the Right Bandwidth
For home electronics:
Bandwidth is a key factor that plays an important role when selecting an oscillosco.
- 50 MHz is good for basic work.
- 100 MHz is better for future projects.
- Higher bandwidth suits advanced engineers.
A higher bandwidth helps measure faster signals accurate.
3. Choose Enough Channels
A two-channel oscilloscope works well for most users.
It allows you to compare two signals at the same time.
For example:
- Input signal
- Output signal
Advanced users may prefer four channels for complex circuits.
4. Check User-Friend Features
A good beginner oscilloscope should have:
- Easy controls
- Automatic measurements
- Clear display
- USB connection
- Simple menus
These features make learning faster.
Common Mistakes
Choosing Price Over Quality
A very cheap oscilloscope may have limited features.
Low-cost models can create problems with:
- Accuracy
- Screen quality
- Signal reading
Choose a model that offers good value.
Buying Too Much Power
Some users buy expensive professional scopes they do not need.
A simple 100 MHz digital oscilloscope can handle many home projects.
Ignoring Probe Quality
Many beginners focus only on the oscilloscope.
However, probes also affect measurements.
Poor probes can create wrong readings.
Not Checking Learning Support
Choose brands that provide:
- Manuals
- Tutorials
- Community support
Good support helps beginners learn faster.
Best Practices
Follow these simple tips:
- Always connect the ground clip correct.
- Use the correct probe setting.
- Start with automatic measurements.
- Avoid measuring signals above the device limit.
- Keep probes and cables organized.
These habits improve safety and measurement accuracy.
Expert Tips
Experts recommend starting with a simple digital storage oscilloscope.
A good beginner setup includes:
- Two-channel oscilloscope
- 50–100 MHz bandwidth
- Good quality probes
- Multimeter
- Soldering tools
This setup can support many electronics projects.
Real Examples
Arduino Project Testing
An oscilloscope can check Arduino PWM signals and communication lines.
It helps users understand:
- Signal timing
- Voltage changes
- Digital pulses
Audio Circuit Testing
Audio hobbyists use oscilloscopes to view sound waves.
They can check:
- Amplifier output
- Audio noise
- Signal quality
Power Supply Testing
Oscilloscopes help find power problems.
Users can check:
- Voltage ripple
- Electrical noise
- Stability
Future Trends
Modern oscilloscopes are becoming easier to use.
Future models may include:
- Better touch screens
- AI-based signal analysis
- Wireless connections
- Cloud data storage
- Smart troubleshooting features
Frequently Asked Questions
1. What is the best oscilloscope for a home electronics laboratory?
The best oscilloscope for a home electronics laboratory is a digital storage oscilloscope . It provides enough power for most beginner and hobby projects.
2. Do beginners need an oscilloscope?
Yes, beginners can use an oscilloscope to learn electronics faster. It helps them see real signals and understand circuit behavior.
3. What is the right budget for buying a home oscilloscope?
Most beginners can choose a budget or mid-range model. A good oscilloscope does not need to be extreme expensive for basic electronics.
4. Is a 100 MHz oscilloscope good for home use?
Yes, a 100 MHz oscilloscope works well for most home electronics projects, including .
5. Can I use an oscilloscope for Arduino projects?
It helps test PWM signals, communication lines, and voltage changes.
6. What is the difference between a multimeter and an oscilloscope?
A multimeter measures simple values like voltage and resistance. An oscilloscope shows how electrical signals change over time.
7. How many channels does a beginner need?
A beginner usually needs two channels. This allows comparison between two signals.
8. Is a digital oscilloscope better than an analog oscilloscope?
For most home users, a digital oscilloscope is better because it offers storage, easy .
9. Which oscilloscope brands are reliable?
Brands like Rigol, Siglent, Tektronix, and Keysight are know for making reliable testing .
10. Can an oscilloscope damage a circuit?
Yes, incorrect connections can damage circuits. Always check voltage limits and use proper measurement methods.
Conclusion
The best oscilloscope for home electronics laboratory does not have to be the most expensive model. The right choice depends on your projects, measurement needs, safety requirements, and budget.
For most beginners, a digital storage oscilloscope with two channels, 50–100 MHz . It can handle Arduino projects, circuit testing, audio work, and many electronics experiments.
An oscilloscope is more than a testing tool. It helps you understand how electronic signals work. It makes troubleshooting easier and improves your electronics skills.